
직전에 DepthMap에 대해서 공부를 했었다. ShadowMap은 DepthMap의 연장선이라고 볼 수 있다. https://tithingbygame.tistory.com/132
[CG] Depth Map(fog를 곁들인..)
Depth Map 만들기Rasterizatiion -> float(MSAA) -> Resolved(No MSAA) -> Post Effects -> Post Processing -> Back Buffer(최종 Swap Chain Present) Depth Map을 관리하기 위해서 DepthOnlyView를 만들어서 사용한다.PostEffect에서는 만든 De
tithingbygame.tistory.com
Shadow Map은 광원 시점에서 물체를 바라봤을 때 생기는 Depth Map을 만든 것이라고 생각하면 된다. 그렇게 만들어진 DepthMap이 그림자가 그려질 위치이다.
1. Viewport 설정
light 입장에서 바라보는 방향으로 Depth Map(shadow map)을 그려줘야 된기 때문에 Viewport light 입장에서 재설정해줘야된다.
shadow map을 그리고 나서는 다시 카메라 시점으로 viewport를 바꿔줘야한다.
2. DSV 셋팅
여기서 한 번 더 DSV를 SRV로 동시에 사용하는 법을 다루고 넘어가겠다.
1. Buffer 생성
- Format은 R32_TYPELESS로 사용한다. (공식문서)
- BindFlags 에 D3D11_BIND_SHADER_RESOURCE를 포함시켜주자!!!!
- Count = 1로 해서 MSAA를 꺼주자
 desc.Format = DXGI_FORMAT_R32_TYPELESS;
 desc.BindFlags = D3D11_BIND_DEPTH_STENCIL | D3D11_BIND_SHADER_RESOURCE;
 desc.SampleDesc.Count = 1;
 desc.SampleDesc.Quality = 0;
위와 같이 세팅을 한 Buffer를 DSV와 SRV를 만들 때 사용해주면 생성한 DSV를 SRV로 사용할 수 있다!
ThrowIfFailed(
    m_device->CreateDepthStencilView(m_shadowBuffers[i].Get(), &dsvDesc,
                                     m_shadowDSVs[i].GetAddressOf()));
       ThrowIfFailed(m_device->CreateShaderResourceView(
           m_shadowBuffers[i].Get(), &srvDesc,
           m_shadowSRVs[i].GetAddressOf()));
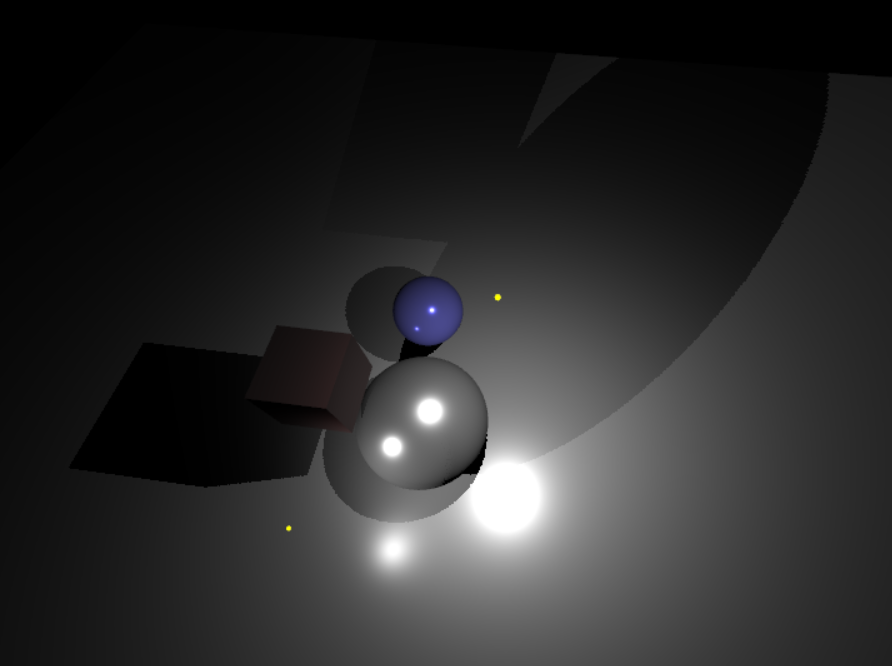
이렇게 그려준 DSV를 확인해보면 잘 그려지고 있는 것을 확인할 수 있다.
(좌측이 카메라 시점에서 내려다보는 상황, 우측이 shadow map (DSV에 그려진 그림) )


3. Render
Render를 어떻게 하느냐가 굉장히 중요하다. 3가지 단계로 나눌 수 있다.
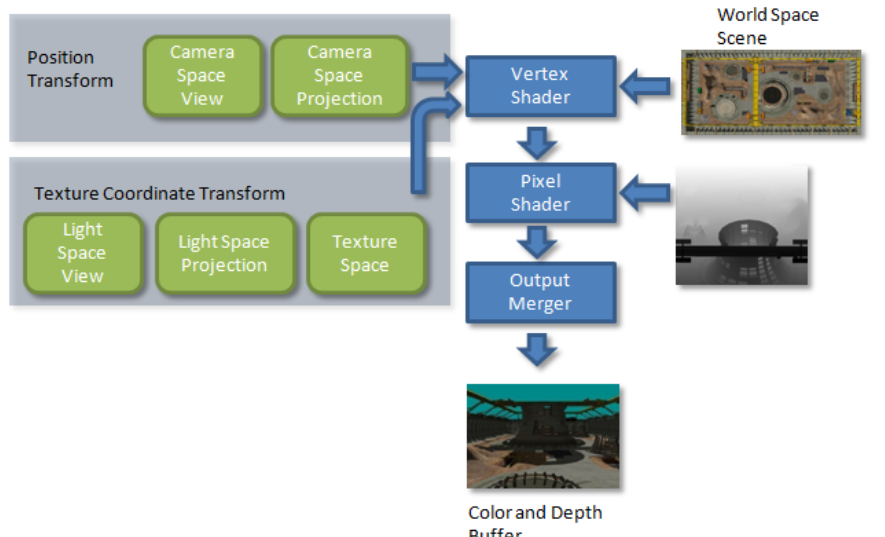
1. Light Screen 좌표계로 Projection을 한다.
CPU에서 Light의 View Matrix, Projection Matrix를 미리 만들어 놓으면 shader에서 projection좌표를 구할 수 있다
            Matrix lightViewRow = XMMatrixLookAtLH(
                light.position, light.position + light.direction, up);
            Matrix lightProjRow = XMMatrixPerspectiveFovLH(
                XMConvertToRadians(120.0f), 1.0f, 0.01f, 100.0f);


            m_shadowGlobalConstsCPU[i].viewProj =
                (lightViewRow * lightProjRow).Transpose();
2. projection한 depth VS Shadow Map depth (두 depth 모두 light 기준이다)를 비교해서 그림자 생성 지점을 찾는다.
shader에 우리가 만들어준 DSV를( shadow Map) 넘겨준 상황이다.
a pos 에서 light screen에 projection했을 때 Depth와 (검정 화살표)
a pos의 shadow Map의 Depth 값은 다를 것이다. (파란 화살표)
두개를 비교하면 a Pos가 그림자가 생겨야 되는 지, 생기면 안되는 지 판단할 수 있다.

이렇게 렌더링을 하게 되면!!
요약
여기서 다양한 오류를 설명도 해주니 도움이 될 것이다.
Common Techniques to Improve Shadow Depth Maps - Win32 apps
This technical article provides an overview of some common shadow depth map algorithms and common artifacts, and explains several techniques—ranging in difficulty from basic to intermediate—that can be used to increase the quality of standard shadow ma
learn.microsoft.com
아래와 같은 상황일 때

첫 번째 렌더패스
Depth Buffer에 그림자를 그려주는 모습
위에서 계속 말했던 것 처럼 Light Screen에서 만들어내고 있다.

두 번째 렌더패스
만든 Depth Buffer와 Camera Screen과 합쳐서 그림자를 형성한다.
고민했던 부분:
1. Light Proj
Light에서 바라보는 방향의 Depth Map을 사용하면 되겠군..까지 생각하는 것은 쉬웠다. 하지만 Light가 바라보는 곳을 어떻게 찾지? 에서 막혔었다.
생각보다 답은 간단했다... 우리에게는 light direction이 있다. 그것을 이용해서 lookAt함수를 사용하면 된다. 그 값을 기억하고 있다가 ShadowMap을 만들 때 사용하면 된다.
 Matrix lightViewRow = XMMatrixLookAtLH(
     light.position, light.position + light.direction, up);

m_shadowGlobalConstsCPU[i].eyeWorld = light.position;
m_shadowGlobalConstsCPU[i].view = lightViewRow.Transpose();
m_shadowGlobalConstsCPU[i].proj = lightProjRow.Transpose();
m_shadowGlobalConstsCPU[i].invProj =
                lightProjRow.Invert().Transpose();
m_shadowGlobalConstsCPU[i].viewProj =
                (lightViewRow * lightProjRow).Transpose();
'ComputerGraphics' 카테고리의 다른 글
| [CG] FrameBuffer 사용해서 postProcessing(후처리) (0) | 2025.01.15 |
|---|---|
| [CG] Multi Light + Fog Effect 구현 (0) | 2025.01.14 |
| [CG] Depth Map(fog를 곁들인..) (0) | 2024.12.07 |
| [CG] Texturing (0) | 2024.12.04 |
| [CG] Cartoon Rendering(Non-Photorealistic Rendering) (0) | 2024.12.04 |
![[CG] FrameBuffer 사용해서 postProcessing(후처리)](http://img1.daumcdn.net/thumb/C300x300/?fname=https%3A%2F%2Fblog.kakaocdn.net%2Fdna%2Fb5A4Iq%2FbtsLPlDgxwr%2FAAAAAAAAAAAAAAAAAAAAAGtqyhgtGQ-IcPRqzpYZsvZv-XjDz0M1AO34avW27tMd%2Fimg.png%3Fcredential%3DyqXZFxpELC7KVnFOS48ylbz2pIh7yKj8%26expires%3D1767193199%26allow_ip%3D%26allow_referer%3D%26signature%3DtZRzseBDO3rPvgsNRD1PqAcJXPA%253D)

![[CG] Multi Light + Fog Effect 구현](http://img1.daumcdn.net/thumb/C300x300/?fname=https%3A%2F%2Fblog.kakaocdn.net%2Fdna%2FxuuUM%2FbtsNugWgJcs%2FAAAAAAAAAAAAAAAAAAAAAP8uZ7bXqfjvN5XrP2k-8fauCDunjvnNIWwNmkpN1Wv0%2Fimg.png%3Fcredential%3DyqXZFxpELC7KVnFOS48ylbz2pIh7yKj8%26expires%3D1767193199%26allow_ip%3D%26allow_referer%3D%26signature%3Dd6c7kg8WOqNtYv8kVd6%252BDMXNXfo%253D)
![[CG] Depth Map(fog를 곁들인..)](http://img1.daumcdn.net/thumb/C300x300/?fname=https%3A%2F%2Fblog.kakaocdn.net%2Fdna%2Fc9iTAj%2FbtsLbxdulpJ%2FAAAAAAAAAAAAAAAAAAAAADn7j-xhiNq_JtvUZK6jyX2II0d6UnnKDqUVVJJWCXGl%2Fimg.png%3Fcredential%3DyqXZFxpELC7KVnFOS48ylbz2pIh7yKj8%26expires%3D1767193199%26allow_ip%3D%26allow_referer%3D%26signature%3DtrPZBQgYbxH78HiV%252B7E2gnVwtYI%253D)
![[CG] Texturing](http://img1.daumcdn.net/thumb/C300x300/?fname=https%3A%2F%2Fblog.kakaocdn.net%2Fdna%2FbnR7TQ%2FbtsK46hy5R6%2FAAAAAAAAAAAAAAAAAAAAAI_lKuJKJ26L0itTZbNWvgXN_y6iCI5PHUHYEAmRZTYT%2Fimg.png%3Fcredential%3DyqXZFxpELC7KVnFOS48ylbz2pIh7yKj8%26expires%3D1767193199%26allow_ip%3D%26allow_referer%3D%26signature%3DH0JxM%252BDway6bmfRdf6xZT3AYL%252Fo%253D)